
HistoryHike
Explore the world, complete quests, and unlock artefacts by following in history's footsteps!
HistoryHike is a highly ambitious location-based Android application designed to make exploration fun, interactive, and rewarding. The project is the culmination of my studies, resulting in an innovative, advanced full-stack system. I developed a performant frontend in Java using Android Studio and a versatile Spring Boot REST API powered backend, hosted on a dedicated VPS.
This was my final University project. Both the project itself and my 57 page report on it received an impressive 90% grade, finalising my First-Class Honours (1:1) grade. If you're interested, you can download my report here.
Please note that this page is still under construction. My other projects can be read about in the meantime. The full project development cycle is detailed in my downloadable report.

Java

Spring

SQL

Android
Login/Registration
When first loading the app, users are greeted with a Login/Registration screen. There is also functionality to request a password reset through the "Forgot your password?" button.
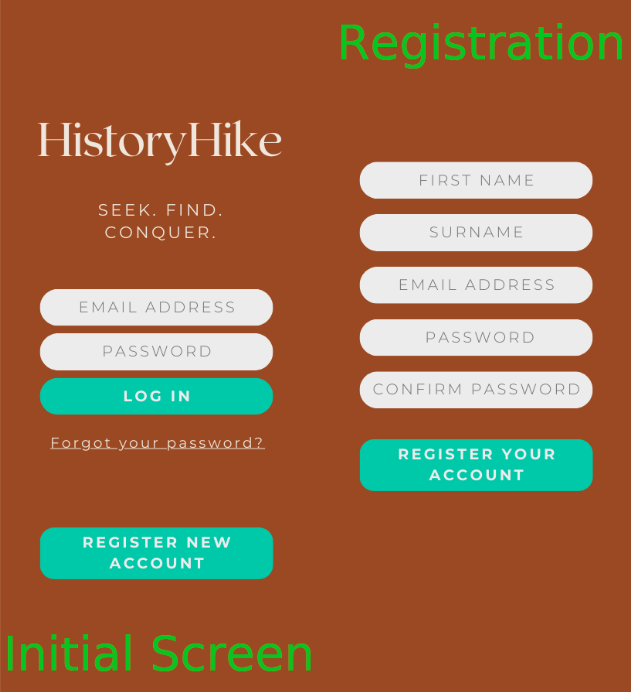
If "Forgot your password" is clicked, the user is prompted for their email address. If a registered email is submitted here, they then see a message to say their password has been reset
A new password is then securely generated and stored on the backend. A simple email is sent to the registered email address containing only this new password, like "Your new password is: G0jGtt7z".
The user can then log in with this password, and visit their account details to change it to a personalised one again.

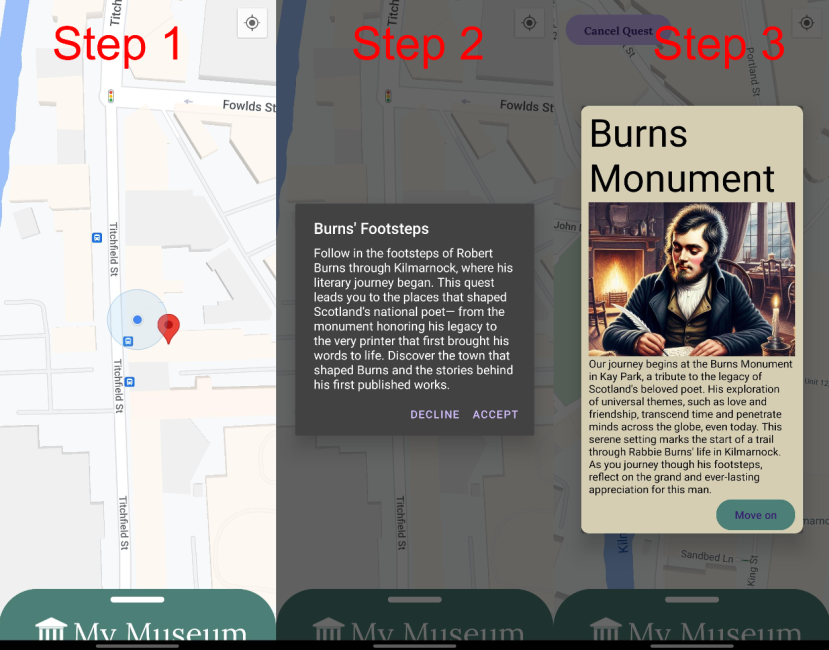
Main Game
When the app is opened with a valid user session, the fun can begin!
The user is shown their location and surroundings on a map, with nearby quest's starting points shown as markers and a slide-able Material UI Bottomsheet, which lists nearby quests and their distance from the user. When the user taps on a quest, they are given a short description of the quest's historical context or significance.
Finally, they move from location to location, getting pieces of the historical story that each quest is relates to.
When the final objective is reached, the user is given a digital artefact to represent their achievement. These are stored in the user's "Museum" and can be viewed at any time.
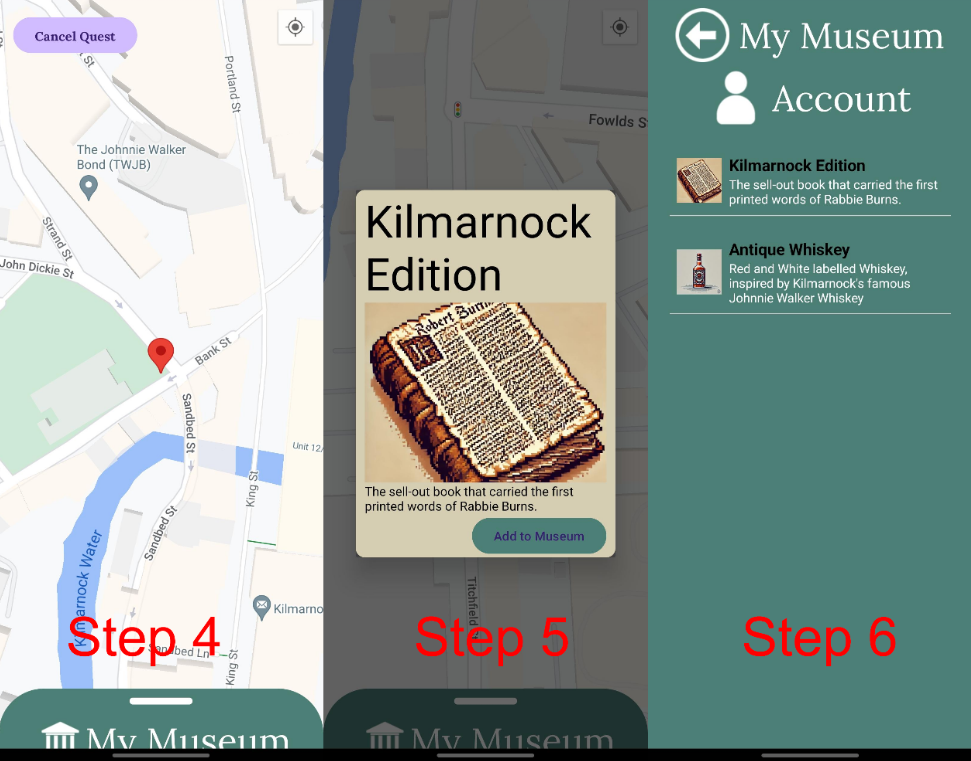
Quests begun with an internet connection can be finished without one, as the app caches the quest assets, such as the objective completion images and the artefacts to be earned.
HistoryHike is designed to be scalable, maintainable, and robust by adhering to industry best practices like the MVC pattern and SOLID principles. Below is an overview of its high-quality system architecture.
Object Relationships
Here we see the relationships between HistoryHike's core components, which ensures scalability, maintainability, and adherence to object-oriented design principles like separation of concerns.
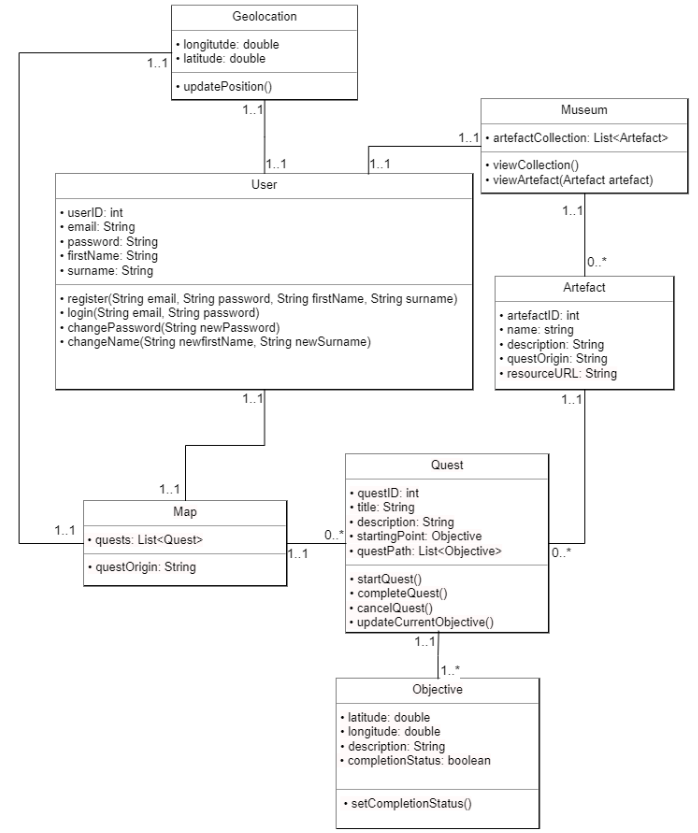
Core Components: The User manages authentication and tracks progress. Quest objects contain geolocation-based Objectives, rewarding users with Artefacts upon completion, which are stored in a personalized Museum. Map and Geolocation services dynamically display progress and enable location-based navigation.
Key Features: This architecture adheres to SOLID principles, ensuring single responsibility and flexibility for future growth. Relationships like 0..* between users and quests allow easy scaling, and logic is cleanly separated through methods such as startQuest() and setCompletionStatus().
State Diagrams
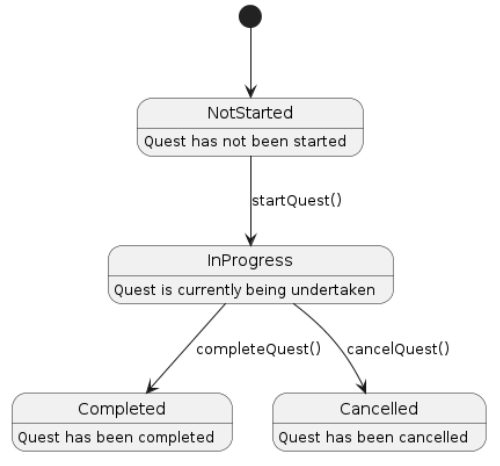
The Objective State Diagram shows how objectives transition from incomplete to complete based on user proximity, as detected by the app. Objectives are nested within quests, maintaining a hierarchical structure.
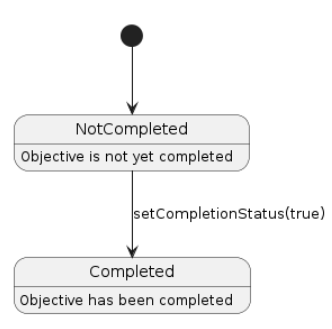
The Quest State Diagram represents the lifecycle of a quest, transitioning from inactive to in-progress, completed, or canceled. Completion is triggered when all associated objectives are completed, while cancellation occurs through user input.
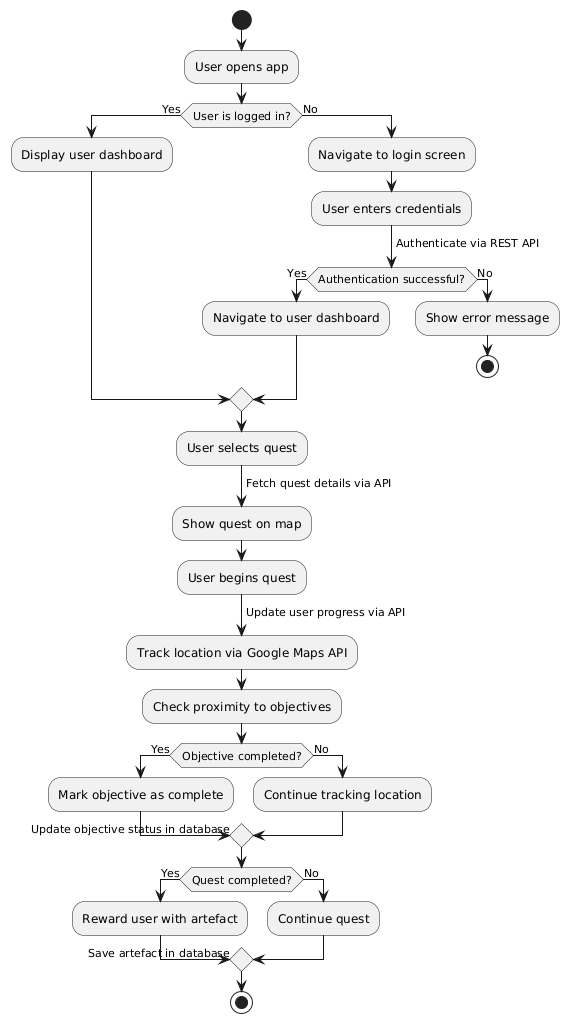
App Activities
The Activity Diagram shows a typical user journey in HistoryHike. It begins with authentication and progresses through selecting and completing quests. The app dynamically handles location tracking, progress updates, and artefact rewards, integrating Google Maps API, a Spring Boot REST API, and a MySQL database for a seamless experience.
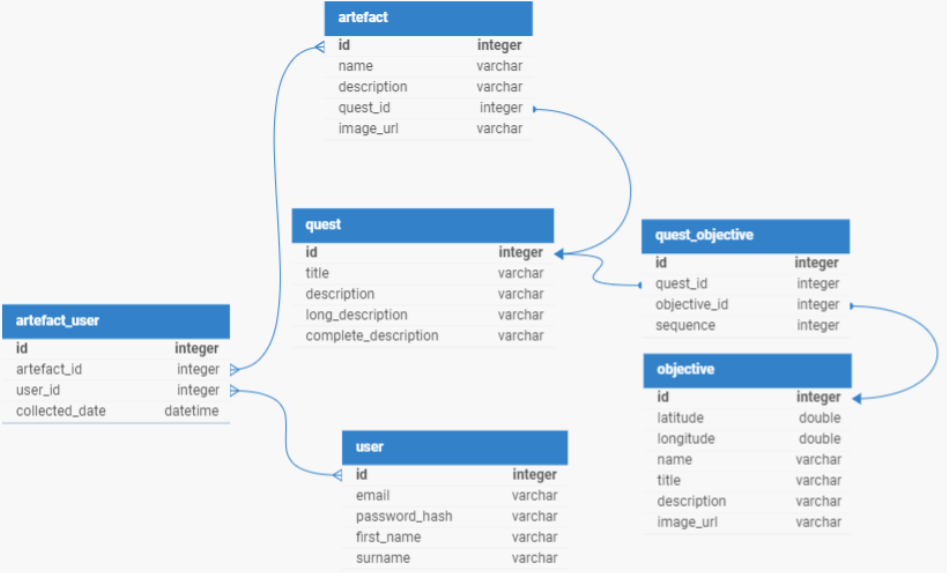
Database
The database schema ensures efficient data management for HistoryHike. It stores user accounts, quests, objectives, and artefacts, enabling seamless tracking of user progress and quest completion.
Key Tables: The User table securely stores account credentials and tracks user-specific data. Quest tables link geolocation-based Objectives and Artefacts, ensuring cohesive quest progress and rewarding users upon completion. Artefacts are stored in a personalized Museum, enhancing user engagement.
REST API Structure
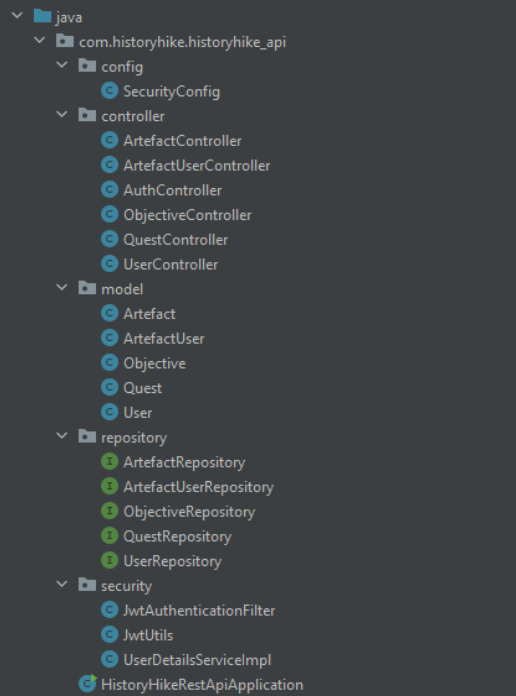
The REST API is modularly structured to ensure maintainability and scalability. By adopting a REST API backend as the main application data source, the app can be extended at all times to include new assets and activities.
API Structure: The Controller layer handles HTTP requests, delegating business logic to the service layer. Model classes define the app's data entities like quests and objectives, while Repository classes abstract database operations. Security ensures user authentication and data protection through JWTs.
REST API Functionality/Endpoints
The REST API provides numerous features through its exposed endpoints. It ensures seamless user management, quest tracking, artefact collection, and more.
When logging in, users receive a JWT (JSON Web Tokens) for authentication, providing industry-standard security.
@PostMapping("/login")
public String login(@RequestBody User user) {
    Authentication authentication = authenticationManager.authenticate(
        new UsernamePasswordAuthenticationToken(user.getEmail(), user.getPasswordHash()));
    return jwtUtils.generateToken(user.getEmail());
}
HistoryHike requests the user's uncompleted quests, to list nearby quests to do. The endpoint for this returns a strctured list of quests and their starting locations (first objective).
@PostMapping("/login")
public String login(@RequestBody User user) {
    Authentication authentication = authenticationManager.authenticate(
        new UsernamePasswordAuthenticationToken(user.getEmail(), user.getPasswordHash()));
    return jwtUtils.generateToken(user.getEmail());
}
When the user completes a quest's final objective, HistoryHike makes a request to the below endpoint, which saves a record in artefact_user. This then allows the suer to store the artefact locally.
@PostMapping("/complete_quest")
public ResponseEntity<ArtefactUser> createArtefactUser(@RequestHeader("Authorization") String token, @RequestBody Map<String, Integer> requestBody) {
    String email = jwtUtils.extractUsername(token.substring(7));
    User user = userRepository.findByEmail(email).orElse(null);
    Artefact artefact = artefactRepository.findByQuestId(requestBody.get("questId"));
    ArtefactUser artefactUser = new ArtefactUser(user, artefact, LocalDateTime.now());
    return ResponseEntity.ok(artefactUserRepository.save(artefactUser));
}
Errors are handled gracefully throughout the application. Possible error-cases were discovered through use of unit testing and Test-Driven Development (TDD) adoption. An example of such a case is found here, where a client attempts to retreive a non-existing quest. By handling such cases, it ensures my backend never crashes, keepnig it very robust.
@GetMapping("/{id}")
public ResponseEntity<Quest> getById(@PathVariable int id) {
Quest Quest = QuestRepository.findById(id).orElse(null);
return Quest != null ? ResponseEntity.ok(Quest) : ResponseEntity.notFound().build();
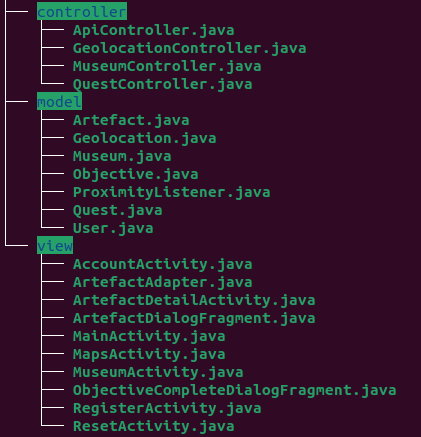
}App Architecture
In developing my app, I focused on the MVC design pattern, following SOLID principles in a test-driven manner. The separation of concerns provided by this approach allowed for rapid prototyping and successful testing at all stages in development. My code was organised as shown here:
UI
I designed my overall UI to be as modular and responsive as possible. To do this, I designed each UI section to be composed of separate components to be filled dynamically. These were then styled relative to screen-size and the proportions of other elements, leading to a consistent user-experience across device types.
Geolocation
I accomplished reliable geolocation through use of the Google FusedLocationProvider API. This highly robust location tracking method requires minimal setup and leads to very dependable geolocation through the use of one or more of the following metrics:
- GPS signal
- Wifi data
- And mobile data triangulation
package com.example.historyhike.controller;
// imports

public class GeolocationController {
    private final FusedLocationProviderClient fusedLocationProviderClient;
    private final Geolocation geolocation;
    private final Context context;
    private final int LOCATION_PERMISSION_REQUEST_CODE = 1000; // Request code
    private LocationCallback locationCallback;
    private ProximityListener proximityListener;

    public GeolocationController(Context context, Geolocation geolocation) {
        this.context = context;
        this.geolocation = geolocation;
        this.fusedLocationProviderClient = LocationServices.getFusedLocationProviderClient(context);
        initialiseLocationCallback();
    }

    public void setProximityListener(ProximityListener listener) {
        this.proximityListener = listener;
    }

    public void setLocationUpdateListener(Geolocation.LocationUpdateListener listener) {
        geolocation.setLocationUpdateListener(listener);
    }

    private void initialiseLocationCallback() {
        locationCallback = new LocationCallback() {
            @Override
            public void onLocationResult(LocationResult locationResult) {
                Log.d("LocationUpdate", "Location update received: " + locationResult.getLastLocation());
                if (locationResult == null) {
                    return; // TODO: Handle locationResult being null?
                }
                proximityListener.onProximityCheck(locationResult.getLastLocation());
                geolocation.updateLocation(locationResult.getLastLocation());
            }
        };
    }

    public void getLastLocation(OnSuccessListener<Location> listener) {
        if (ActivityCompat.checkSelfPermission(context, Manifest.permission.ACCESS_FINE_LOCATION) != PackageManager.PERMISSION_GRANTED && ActivityCompat.checkSelfPermission(context, Manifest.permission.ACCESS_COARSE_LOCATION) != PackageManager.PERMISSION_GRANTED) {
            // Permissions check
            return;
        }
        fusedLocationProviderClient.getLastLocation().addOnSuccessListener(listener);
    }

    @SuppressLint("MissingPermission")
    public void startLocationUpdates(Activity activity) {
        // Check for location permissions and request if none. this is already done, but I suppose best to be safe.
        if (ContextCompat.checkSelfPermission(context, Manifest.permission.ACCESS_FINE_LOCATION) != PackageManager.PERMISSION_GRANTED) {
            ActivityCompat.requestPermissions(activity, new String[]{Manifest.permission.ACCESS_FINE_LOCATION}, LOCATION_PERMISSION_REQUEST_CODE);
            return;
        }

        LocationRequest locationRequest = LocationRequest.create();
        locationRequest.setInterval(10000); // 10 seconds
        locationRequest.setFastestInterval(3000); // 3 seconds
        locationRequest.setPriority(LocationRequest.PRIORITY_HIGH_ACCURACY);

        fusedLocationProviderClient.requestLocationUpdates(locationRequest, locationCallback, Looper.getMainLooper());
    }

    public void stopLocationUpdates() {
        fusedLocationProviderClient.removeLocationUpdates(locationCallback);
    }

    public int getLocationPermissionRequestCode() {
        return LOCATION_PERMISSION_REQUEST_CODE;
    }
}
Third-party Integrations
Displaying user location and nearby objectives on a map of the user's surroundings was a core requirement of the project. For this, I used the Google Maps API. and provided functionality to interact with the map, recentre it on the user's position and interact with map markers to read more information regarding quests or obejctives.
Asset Caching
To ensure usability even when offline, my app implements efficient image caching through the Glide library. This allows artefact images, objective visuals, and quest maps to remain accessible once they are loaded, enabling users to continue exploring and completing quests without an active internet connection.
Additionally, the app queues API requests during connectivity outages, ensuring that user progress is not lost. For example, when completing a quest offline, the completion data is stored locally and automatically sent to the backend once connectivity is restored. This robust offline support enhances reliability, ensuring a consistent and enjoyable user experience regardless of network conditions.